If you’ve ever searched for how to screenshot on Dell laptop, you’re not alone. Whether you’re saving an important error message, capturing a funny moment, or documenting something for work, knowing how to take a screenshot quickly can save you a lot of time. Dell laptops — whether you’re using an Inspiron, XPS, Latitude, or Vostro — all run Windows, and there are multiple fast ways to capture your screen. In this complete guide, we’ll walk you through every method, step by step, so you never have to wonder again.
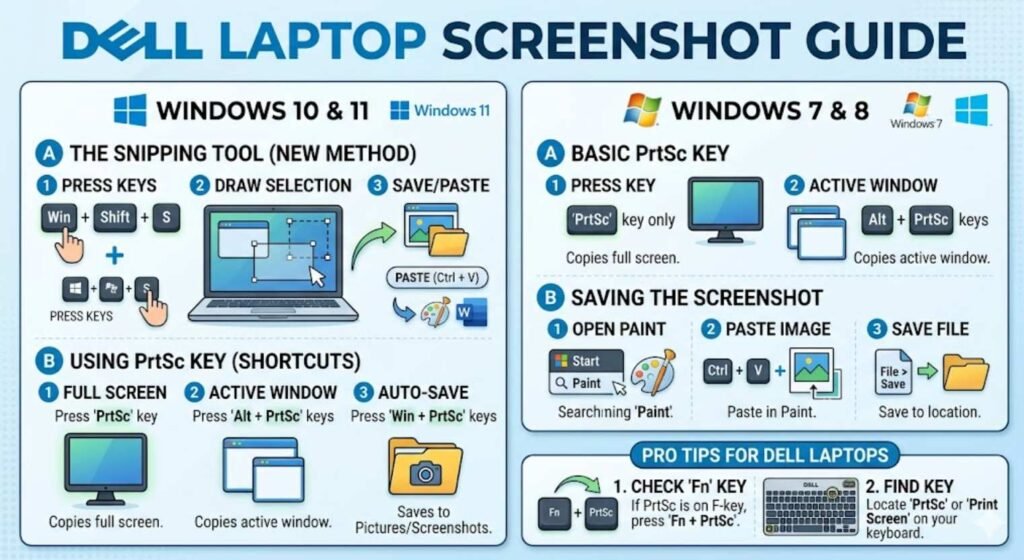
1. Use the Print Screen (PrtScn) Key — The Quickest Method
The fastest way to take a screenshot on a Dell laptop is by using the Print Screen key, usually labeled PrtScn or PrtSc on your keyboard. Here’s how each shortcut works:
PrtScn — Capture the Entire Screen
Press the PrtScn key on your keyboard. This copies a screenshot of your entire screen to the clipboard. To save it, open Paint, press Ctrl + V to paste, then press Ctrl + S to save the file.
Windows Key + PrtScn — Auto-Save Screenshot
Press Windows + PrtScn together. Your screen will dim for a moment, confirming the screenshot was taken. It is automatically saved to:
C:\Users\YourName\Pictures\Screenshots
This is the most convenient method if you want to skip the paste step entirely.
Alt + PrtScn — Capture Active Window Only
Press Alt + PrtScn to capture only the currently active window (instead of the full screen). Paste it into Paint or any image editor to save.
2. Use the Snipping Tool — Best for Custom Screenshots
Windows includes a built-in tool called Snipping Tool that lets you capture any specific area of your screen. It’s ideal when you don’t want to capture the entire screen.
How to Open Snipping Tool on Dell Laptop
- Click the Start Menu and type Snipping Tool in the search bar.
- Click the app to open it.
- Click New to start a new screenshot.
- Select the area of the screen you want to capture by clicking and dragging.
- The screenshot will appear in the Snipping Tool window — click File > Save As to save it.
Snip Types Available
- Free-form Snip — Draw any shape around the area you want.
- Rectangular Snip — Drag a rectangle around the area (most commonly used).
- Window Snip — Captures a specific open window.
- Full-screen Snip — Captures the entire screen.
3. Use Snip & Sketch (Windows 10 & 11) — Modern and Powerful
Snip & Sketch is the updated version of Snipping Tool available in Windows 10 and Windows 11. It offers annotation tools and a cleaner interface.
Keyboard Shortcut
Press Windows + Shift + S. Your screen will dim and a small toolbar will appear at the top. Choose from:
- Rectangular Snip
- Freeform Snip
- Window Snip
- Full-screen Snip
After taking the snip, a notification will appear at the bottom right. Click it to open Snip & Sketch, where you can annotate and save the screenshot.
How to Open Snip & Sketch from Start Menu
- Click Start and search for Snip & Sketch.
- Open the app and click New.
- Select your area and annotate if needed.
- Save using Ctrl + S.
4. Use Xbox Game Bar — Great for Gaming Screenshots
If you’re a gamer using a Dell laptop, the Xbox Game Bar is built into Windows 10 and 11 and lets you take screenshots while gaming without leaving the game.
How to Take a Screenshot with Xbox Game Bar
- Press Windows + G to open the Game Bar overlay.
- Click the Camera icon in the Capture widget, or press Windows + Alt + PrtScn.
- Screenshots are saved to:
C:\Users\YourName\Videos\Captures
5. Use Dell’s Built-in Function Keys (Fn Key)
Some Dell laptop models require you to press the Fn (Function) key along with PrtScn, especially if PrtScn is a secondary function on a key. If pressing PrtScn alone doesn’t work, try:
- Fn + PrtScn — Full screen capture to clipboard
- Fn + Windows + PrtScn — Auto-save to Screenshots folder
This is common on Dell Inspiron and XPS models with compact keyboards.
6. Use Third-Party Screenshot Tools on Dell Laptop
If you need more advanced features like scrolling screenshots, delay capture, or cloud sharing, third-party tools are a great option.
Top Screenshot Tools for Dell Laptops
- Lightshot — Lightweight, free, and lets you share screenshots instantly online.
- ShareX — Advanced open-source tool with scrolling capture and annotation.
- Greenshot — Simple and fast with quick editing options.
- Snagit — Professional-grade tool for tech writers and developers (paid).
7. Where Are Screenshots Saved on Dell Laptop?
One of the most common follow-up questions after taking a screenshot is: where did it go? Here’s a quick breakdown:
| Method Used | Where It’s Saved |
|---|---|
| PrtScn | Clipboard only (paste manually) |
| Windows + PrtScn | Pictures > Screenshots folder |
| Snipping Tool / Snip & Sketch | You choose where to save |
| Xbox Game Bar | Videos > Captures folder |
8. How to Take a Screenshot on Dell Laptop Without Keyboard
If your keyboard isn’t working properly or you’re using a Dell laptop in tablet mode, you can still take a screenshot using the on-screen keyboard or Windows accessibility features.
Using On-Screen Keyboard
- Go to Start > Settings > Ease of Access > Keyboard.
- Turn on the On-Screen Keyboard.
- Click PrtScn from the on-screen keyboard to capture the screen.
Quick Reference: Dell Laptop Screenshot Shortcuts
| Shortcut | Action |
|---|---|
| PrtScn | Copy full screen to clipboard |
| Windows + PrtScn | Save full screen automatically |
| Alt + PrtScn | Copy active window to clipboard |
| Windows + Shift + S | Open Snip & Sketch tool |
| Windows + G | Open Xbox Game Bar |
| Fn + PrtScn | Screenshot on compact Dell keyboards |
Frequently Asked Questions (FAQs)
How do I take a screenshot on a Dell laptop running Windows 11?
The methods are exactly the same as Windows 10. Press Windows + PrtScn to auto-save a screenshot, or use Windows + Shift + S to open Snip & Sketch for a custom capture.
Why is my PrtScn key not working on my Dell laptop?
Try pressing Fn + PrtScn instead. Some Dell models require the Fn key to activate the Print Screen function. Also check if any third-party software is blocking the key.
How do I take a scrolling screenshot on a Dell laptop?
Windows doesn’t support scrolling screenshots natively. Use a third-party tool like ShareX or PicPick, which both offer scrolling capture features for free.
Can I take a screenshot on a Dell laptop without the Print Screen key?
Yes. Use Windows + Shift + S to open Snip & Sketch without needing the PrtScn key at all.
Final Thoughts
Now you know exactly how to screenshot on a Dell laptop — no matter which model you have or which version of Windows you’re running. From the simple PrtScn key to the advanced Snip & Sketch tool, there’s a method for every situation. Bookmark this guide so you can refer back to it whenever you need a quick reminder, and share it with anyone who’s struggling to capture their screen on a Dell device.
For more tech updates Visit: Techsif